I’ve started a new blog that is currently focusing on both SharePoint and Nintex forms and workflows at:
Out of the Box Tutorials (ootbTutorials.com)
Eventually this old blog will be going away. Thanks.
I’ve started a new blog that is currently focusing on both SharePoint and Nintex forms and workflows at:
Out of the Box Tutorials (ootbTutorials.com)
Eventually this old blog will be going away. Thanks.
Posted by Nick Hurst on May 14, 2016
https://sphelp4u.wordpress.com/2016/05/14/blog-has-moved/
After upgrading our MySites from 2010 to 2013, our trending tags page was broken. If we clicked on a trending tag, an error was displayed, and if you expand the error details you see:
Display Error: The display template had an error. You can correct it by fixing the template or by changing the display template used in either the Web Part properties or Result Types.
Template ‘~sitecollection/_catalogs/masterpage/Display Templates/System/Control_TagFeed.js’ not found or has syntax errors. (LoadTemplate: )

In a stunning turn of events, the error generated by SharePoint was actually correct. In the Site Collection Masterpages > Display Templates > System folder, the Control_TagFeed.html file is there but the .js file is missing:

1. Go to the Masterpage library settings page, click on the Manage files which have no checked in version:

2. Check the box next to Control_TagFeed.js and then click on the Take Ownership of selection link:

3. Return to the Masterpages > Display Templates > System folder, you should now see the Control_TagFeed.js file. Important: You cannot check-in the .js file because it’s associated with the .html file. Instead you have to check-out the Control_TagFeed.html file:

4. Then Check In the Control_TagFeed.html file, this will check in both the .html and the associated .js file:

*If you have approval enabled on the library, you will also need to approve the .html file which will approve the .js file as well.
5. Now both the files should be published and approved:

6. Which will fix your trending tags page and show related conversations for that tag:

Posted by Nick Hurst on November 6, 2013
https://sphelp4u.wordpress.com/2013/11/06/mysite-trending-tags-is-broken/
I’m just re-posting this information so I can easily find it again. I had found a similar post but had noticed that the solution didn’t work on Firefox. I found the solution that also addresses Firefox on Sofie’s SharePoint blog:
http://vandeso.blogspot.com/2013/06/sharepoint-2013-show-title-row-in.html
Code for reference:
The JavaScript code looks like this:
var refElm = document.getElementsByClassName('ms-searchCenter-refinement');
if (refElm.length > 0) {
  // Unhide the title row
  document.getElementById('s4-titlerow').setAttribute('style', 'display:block !important');
  // Set the Site Title
  document.getElementById('DeltaPlaceHolderPageTitleInTitleArea').innerHTML = 'Search Center';
  // Hide the search icon
  document.getElementById('searchIcon').style.display = 'none';
  // Remove the top margin
  refElm[0].style.marginTop = 0;

  // The following lines are only needed for firefox
  var css = '#s4-bodyContainer #s4-titlerow { display: block !important; }',
      head = document.getElementsByTagName('head')[0],
      style = document.createElement('style');
  style.type = 'text/css';
  style.appendChild(document.createTextNode(css));
  head.appendChild(style);
}
If you are using jQuery, you can use this:
if ($('.ms-searchCenter-refinement').length > 0) {
  // Unhide the title row
  $('#s4-titlerow').attr('style', 'display:block !important');
  // Set the Site Title
  $('#DeltaPlaceHolderPageTitleInTitleArea').text('Search Center');
  // Hide the search icon
  $('#searchIcon').hide();
  // Remove the top margin
  $('.ms-searchCenter-refinement').css('margin-top', '0');

  // The following line is only needed for firefox
  $('body').append('<style>#s4-titlerow { display: block !important; }</style');
}
Posted by Nick Hurst on September 9, 2013
https://sphelp4u.wordpress.com/2013/09/09/show-title-and-top-nav-in-search-center/
The out of the box formatting on the SharePoint 2013 Enterprise Wiki Category page ( _layouts/15/Categories.aspx) currently displays all the pages beneath the items in the left hand navigation. This is something that you don’t notice at first, because there are only 2 items in the left hand navigation on site creation. But as more items are added,
Description of Issue:
When clicking on a Enterprise Wiki Category: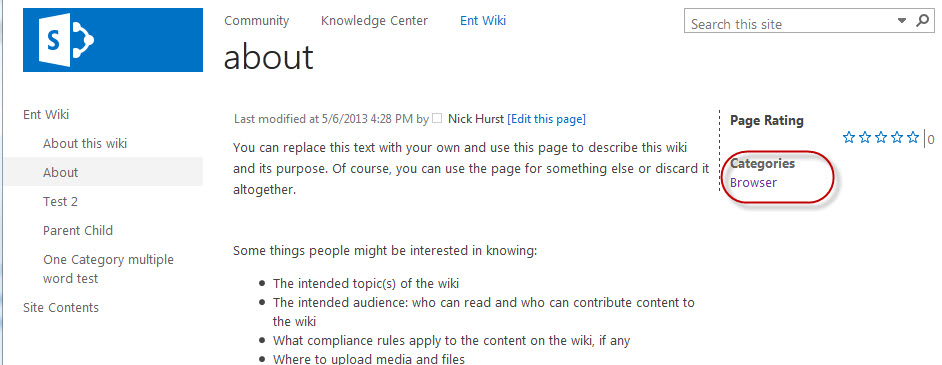
The layouts page provided by SharePoint displays the wiki pages in that category underneath all the left hand navigation items:
This is the second bug I’ve found with this page as the search for pages with this category link also doesn’t work correctly:
http://nickhurstblog.com/2013/05/07/sharepoint-2013-enterprise-wiki-search-for-pages-with-this-category-broken/
Posted by Nick Hurst on May 7, 2013
https://sphelp4u.wordpress.com/2013/05/07/sharepoint-2013-enterprise-wiki-category-page-formatting-issue/
Found a bug where on Enterprise Wiki’s, if you click on one of the page categories, then click on the “search for pages with this category” link, the search query is improperly formatted. Since this occurs on a _layouts page, I’m not sure exactly how to fix this:
The issue:
On Enterprise wiki’s you can setup the Wiki Categories column to use a Managed Metadata Service term set. This allows you to tag pages, and out of the box this turns the tags into links. Notice on this page how two Categories are specified for this page:

Clicking on a category brings you to a _layouts page (_layouts/15/Categories.aspx?….) that lists other Enterprise Wiki pages with the same tag, and a link to “search for pages with this category”:

Clicking on this link brings you to the OSSSearchResults page with the WikiCategory={Tag Name] query already specified:

The problem with this format, is the = symbol means only exact matches will be returned (notice the 1 result). So in this case, only enterprise wiki pages that only have one wiki category specified, and the wiki category of Browser is returned. Any pages with multiple wiki categories even if one of the tags is Browser will not be returned.
Instead the search format should be formatted: WikiCategory:{Tag Name} which will return all pages that contain the wiki category tag:
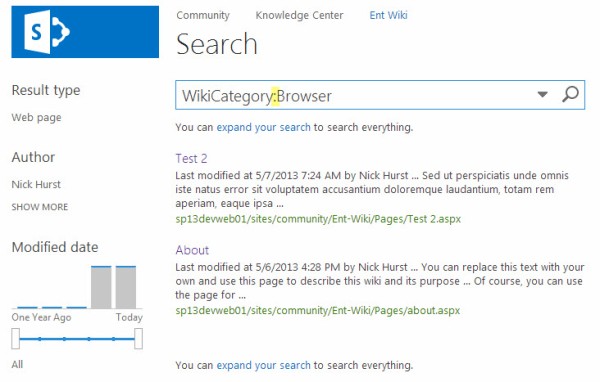
*Notice how both the pages that have the Browser tag specified are now returned.
Posted by Nick Hurst on May 7, 2013
https://sphelp4u.wordpress.com/2013/05/07/sharepoint-2013-enterprise-wiki-search-for-pages-with-this-category-broken/
In my opinion there are 6 main challenges that must be planned for and communicated when using SharePoint Document Libraries to store documents:
The OptimisticTitleOverride feature was first implemented in SharePoint 2010, what this feature does is sometimes create a search results title for an Office Document. What it usually does, is if there is bold or large text at the top of the document then it inserts that bolded or larger text for the document title in search results. This feature can be useful in many scenarios but if you have very many Templated documents or any Pre-Office 2007 documents, this feature usually creates huge problems.
For example, let’s say you downloaded an Office Word Template for meeting Agenda’s. And your organization used this template to create 100’s of meeting agenda’s. In many of these Word templates, the first bolded text is the word AGENDA. So even if people had entered descriptive titles in the libraries, when people search, all they see if the generic AGENDA search result. The other big problem area is with pre-2007 office formats. In these scenarios the feature usually just takes the first visible text and shows it in search results. What makes this feature even more confusing, is it only happens some of the time.
In many organizations this feature might work good enough where nothing needs to be changed. But if you have templates, old office formatted documents, or want a more consistent search results experience:
How how to disable OptimisticTitleOverride in SharePoint 2010
In SharePoint 2010 you can disable this feature by following the steps in this forum post provided by Saji Viswambharan:
http://social.msdn.microsoft.com/forums/en-US/sharepointgeneralprevious/thread/dc01077f-c27f-443e-b76c-8018df1ae564/#7177d980-14b2-413c-8d6c-cc979a1b39d6
Configuration for this feature is kept in Windows Registry of SharePoint server and can be turned off by performing the following simple steps.
How how to disable OptimisticTitleOverride in SharePoint 2013
There does not seem to be a way to disable this feature in SharePoint 2013. I’ve created a forum post and I will update that and this article if I find a solution:
http://social.technet.microsoft.com/Forums/en-US/sharepointsearch/thread/e27b6b4f-d38f-49ec-9fca-7aa21099886f
Posted by Nick Hurst on May 6, 2013
https://sphelp4u.wordpress.com/2013/05/06/optimistic-title-override-feature-overriding-search-result-titles/
On our new SharePoint 2013 on premise installation, we noticed that the Most Popular items report wasn’t working for Document Libraries. Or maybe I should say, the Most Popular Items wasn’t recording any views for documents in the document libraries. It was working for Page Libraries and Videos (in site assets libraries) though, so it didn’t seem to be a problem with the timer job.
So in Document Libraries there is a new Most Popular Items option under the Library tab:

Clicking on this option provides a report that shows the number of Recent views, and the number of Total (Ever) views:

Solution/Explanation
We couldn’t find this documented anywhere, but what we found is that files need to be opened using the Office Web Apps (OWA) in order for their views to be recorded. We’ve done some testing and opening the file directly in the desktop application, or even editing the file directly in the desktop application are never recorded. My one disclaimer is we are using Office 2010, I’m curious if Office 2013 perhaps records views and edits using the desktop application?
Luckily the latest OWA patch now allows PDF’s to open in the Word Office App as well, so those views are recorded. If you have any non office or non PDF file types in the library, views will not be recorded for these items unfortunately.
Posted by Nick Hurst on April 30, 2013
https://sphelp4u.wordpress.com/2013/04/30/library-most-popular-items-not-working/
I had a requirement to add commenting ability to SharePoint 2013 Enterprise Wiki Pages. An easy way to do this, is to add the SharePoint Note Board webpart to the page layout. The problem is that when there are no notes or comments for that page, some default text is displayed underneath the note board that says:
There are no notes posted yet. You can use notes to comment on a page, document, or external site…..

What I want to do is create a new page layout that has the note board beneath the wiki text area, and hide the default text for when there are no notes or comments. So my finished page layout should look like this:

Creating a new Enterprise Wiki Page Layout
So first go to the MasterPage library and download the EnterpriseWiki.aspx page layout. Open the file with a text editor, and Save the file as something unique like: Ent-Wiki-with-Comments.aspx
In the file, Find and select the following div:
<div class=”edit-mode-border”>
<PublishingWebControls:RichHtmlField id=”PageContent” FieldName=”PublishingPageContent” MinimumEditHeight=”400px” DisableInputFieldLabel=”true” runat=”server”/>
</div>
Replace with:
<!– Custom Comments: I had to add the float and width to this div so the right column still displayed inline –>
<div class=”edit-mode-border” style=”float:left; width:95%;”>
<PublishingWebControls:RichHtmlField id=”PageContent” FieldName=”PublishingPageContent” MinimumEditHeight=”400px” DisableInputFieldLabel=”true” runat=”server”/>
<!– Custom Comments: This div contains the Notes webpart which I am labeling Comments –>
<div class=”Custom-Comments-Control”>
<br>
<hr>
<b>Comments:</b>
<br>
<SharePointPortalControls:SocialCommentControl ID=”CommentControl” runat=”server”/>
<style type=”text/css”>
/*Custom Note: Making the notes area fill the entire area, the default width is set to 390px for some reason*/
.ms-socialCommentItem .socialcomment-contents
{ width: 100% }
/*Custom Comments: Hiding the first div so the default text about no notes is hidden*/ #ctl00_PlaceHolderMain_CommentControl_PlaceHolder>div:first-of-type
{ display: none; }
/*Custom Comments: Making the first div visible when there is a comment entered*/ #ctl00_PlaceHolderMain_CommentControl_socomHolder_0
{ display: inline !important; }
</style>
</div>
</div>
This will insert the Note Board or Social CommentControl into the Wiki Page beneath the text area, and format it so the default text is hidden. Save the page layout.
Adding your new Layout to the Site
Go to the Master Page Gallery and upload your new page layout (Files tab > Upload Document). Enter the following value; Content Type: Page Layout, Title: Enter a descriptive title, Associated Content Type: Page Layout Content Types, Content Type Name: Enterprise Wiki Page:

Once the Page Layout is uploaded, Publish a Major Version of the file:

In order to be able to choose this new page layout, go to your Enterprise Wiki Site. And then select Site Settings > Page Layouts and site templates. Under the Page Layouts section, select your new Wiki Layout and click the Add button to move the layout to the right hand side column:

*If your page layouts section has the Pages in this site can use any layout, you are probably in the Site Settings for your Site collection home and not for the Enterprise wiki.
Click the OK button at the bottom of the page.
Now when you add or edit an enterprise wiki page, you can change the layout to include the comments section by selecting the Page tab, Page Layout, Enterprise Wiki Layout with Comments:

Your new layout will have the Note Board added to it, labeled Comments, and without the default text:
Posted by Nick Hurst on April 30, 2013
https://sphelp4u.wordpress.com/2013/04/30/hiding-note-board-social-comment-webpart-default-text/
In my opinion there are 6 main challenges that must be planned for and communicated when using SharePoint Document Libraries to store documents:
One of the biggest issues with using SharePoint for storing and managing documents is that the document Title and not the document file Name is what is used to display items in Search Results. Although other search engines do the same thing, this is confusing for users because the document file name (example: EmployeeOnBoardingProcess.docx) is what people see on their desktop, and even by default in document libraries.
What is the document title? The document title is a property of the document that can actually exist on the file even if the file is outside of SharePoint. This means that office documents or PDFs might already have a title associated with them, when they are uploaded to SharePoint. That’s a great feature if the title is descriptive for that specific document, but many times the title is misleading, generic, or a templated value (I’ve seen hundreds of documents that all had the title “Policy & Procedure Template”). Not all documents have a title property in them though, if a document does not have a title, the document name will be displayed in Search Results.
Title vs Name in Search Results Example. In the example below the pink highlighted text is the document title, and the yellow is the document name. As you can see, these titles do not reflect what these documents are really about:

To view any documents title that is on SharePoint:
1. Hover over the document name, a dropdown arrow will appear
2. From the dropdown menu, select View Properties
To view a Office Documents (Word, Excel, PowerPoint) Title that resides on your desktop or in a shared drive (X: drive):
1. Right click on the document, and choose properties.
2. Click on the Details Tab
3. You can now see the document title (some documents have a title, some do not)

To view a PDF’s Title on your desktop or in a shared drive (X: drive):
1. Open the PDF document
2. Under the File menu, choose Properties
3. Under the description tab, there will be a field called Title.

Where do these Titles come from?
Some of the pre-2007 versions of Microsoft Office used to auto-populate the document title field with the first line of text from the document. This was especially problematic when a document had a header as the header text was what was usually saved as the document title. So “Policy and Procedure Template” might have been saved as all the policy and procedure document titles for example. And even though many of these documents have been edited with Office 2007 or 2010 since, this title remained a property of the document. And any new document created using the old document template, would also have this generic title as well.
The majority of PDF titles either come from the office application title, or some PDF creation tools auto populate the Title field for you when creating a PDF. For example, we have 100’s of PDF Titles that are formatted: Microsoft Word 2007 – xxxxxxx. The program used to create these PDF’s autopopulated the Title with the type of file that the PDF was created from, followed by a dash and the document name.
Posted by Nick Hurst on April 12, 2013
https://sphelp4u.wordpress.com/2013/04/12/sharepoint-search-results-display-document-titles-instead-of-document-names/
There are 4 primary ways to get information from a SharePoint List or library (this also includes Announcement lists, Calendars, and Blogs):
RSS Feeds allow you to subscribe to a data source to get updates when new items are added. There are many different RSS readers out there, but for this article we are just going to focus on Outlook. There are links at the bottom of this article to more information about RSS and other RSS readers.
Basically all SharePoint Libraries, Lists, Blogs and even Calendars have a RSS Feed option. What I have found is that this option works best for Blog Postings, Discussion Board Items, and Announcements list. Although the RSS Feed option is available for Document libraries and Calendars, the information presented really doesn’t make much sense and I would recommend either Email Alerts or to Sync the List with Outlook.
Enabling RSS functionality in Outlook
First you need to enable the RSS Functionality in Outlook for RSS Feeds:
Outlook 2007
1. Click Tools > Options
2. Select the Other tab > General > Advanced Options
3. Under General Settings check the box for Sync RSS Feeds to the Common Feed List
4. Click OK twice to close the Options dialog box
Outlook 2010
1. Click File > Options
2. Select Advanced
3. Under RSS Feeds, check the box for Synchoronize RSS Feeds to the Common Feed List (CFL) in Windows
4. Click OK to close the options dialog box.
Outlook 2011 (Mac)
The RSS functionality cannot be created nor edited from Outlook 2011
Creating an RSS Feed
1. Go to any list or discussion board, under the List tab, click on the RSS Feed icon in the Ribbon.

* For Blog Posts there is a link at the bottom of the all Blog listing pages:
2. This will open up the RSS feed page for that list. At the top of the page, click on the Subscribe to this feedlink.
3. Name your Feed, and you can leave the dropdown field Create in: Feeds or you can create a folder for Bridge Feeds. Click the Subscribe button.

4. You should now see a RSS Feeds category in Outlook, if you expand this out you will see the items you have subscribed to.
Additional RSS feed Information
What is RSS and other RSS Readers: http://www.whatisrss.com/
Outlook 2010 subscribing to RSS Feeds: http://office.microsoft.com/en-us/outlook-help/subscribe-to-an-rss-feed-HA010355679.aspx
Outlook 2010, unsubscribing to RSS Feeds: http://office.microsoft.com/en-us/outlook-help/unsubscribe-from-an-rss-feed-HA010354977.aspx?CTT=5&origin=HA010355679
Posted by Nick Hurst on April 12, 2013
https://sphelp4u.wordpress.com/2013/04/12/rss-feeds-on-sharepoint-lists-and-blogs/
