InfoPath 2010: Repeating table incremental row number

This post will show you how to create an auto generated row number for your repeating table in InfoPath.  Having a numbered column in your repeating table helps separate the user entries:

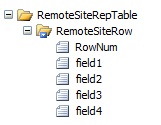
First create a repeating table with an extra column for the Row Number.  I would recommend re-naming both the repeating table and row so it’s not group1 and group2.  In this example I’ve named them RemoteSiteRepTable and RemoteSiteRepRow.  The row name is especially important as you will be using it in your formula.  I also renamed the first field to RowNum:
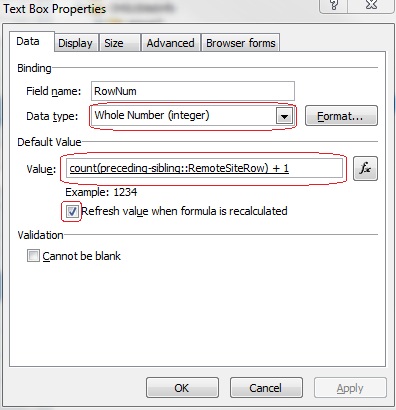
Right click your RowNum field and choose Textbox Properties.  Change the Data type to Whole Number (integer).  Click on the function (fx) button to open the Insert Formula window and paste the following formula (renaming RemoteSiteRow to your row name) into the value field:
count(../preceding-sibling::my:RemoteSiteRow) + 1

Hit the Verify Formula button which will resolve the formula to:
count(preceding-sibling::RemoteSiteRow) + 1

Click the OK button to return to the Text Box Properties screen and make sure the Refresh value when formula is recalculated checkbox is selected and hit the OK button:
InfoPath 2010: Multi-line Text fields publishing to SharePoint

If you publish a Multi-Line textbox from InfoPath to a SharePoint column, you might discover that the text cuts off after 255 characters.  This is because InfoPath maps the textbox control to a “single line of text” column type regardless of whether the InfoPath textbox is mutli-line or single.

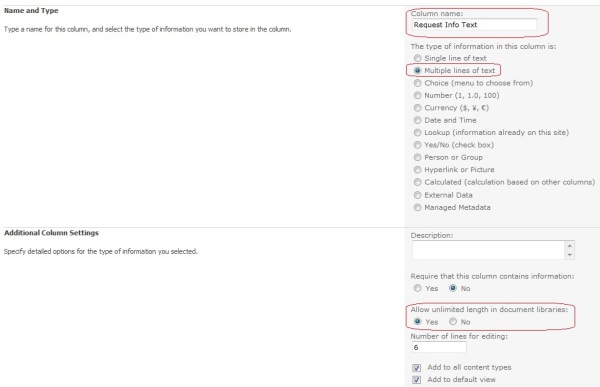
The work around for this is to manually create a “multiple lines of text” column type in the destination library and then CHANGE the InfoPath field mapping to this new column.  Before you begin you must have already published the form to a SharePoint library and included the InfoPath multi-line text field in the published columns.  Once this has been done go to your SharePoint form library and create a Multiple lines of text column:

I usually just add the word “Text” to the end of the column name to make it unique.  So if the InfoPath field was named “Request Info”, I would name the SharePoint column “Request Info Text” to make it unique.

Choose the Multiple Lines of text option.  Check the Yes button to allow unlimited length in document libraries.  Click on the OK button.

Now go to your InfoPath form, choose the top File tab, the side Publish tab, and click on the SharePoint Server button.

Since we have already setup the publishing settings to the SharePoint Library before we started, just hit Next for the Location, Next for the Type of Form, Next for the location of the form, and you should see the list of Columns:

Highlight the InfoPath multi-line field name (Request Info) and click Modify.  From the Column Name dropdown box select the new SharePoint multi-line column (Request Info Text) and click OK.  You have now mapped the InfoPath field (Request Info) to a multi-line SharePoint column (Request Info Text).  Click Next and then Publish to complete the wizard.